How to use the Device Video Output Color Calibration page to adjust your recording colors?
If the colors in your recorded video look different from what you actually see on your display, you can use our online Device Video Output Color Calibration page to fine-tune the colors yourself and send us the result. Based on what you submit, we will adjust the recording color parameters in the firmware so that future recordings better match your needs.
Page address: https://www.cloner-alliance.com/custom-calibration/
When to use this page
Use this page when the video captured by your ClonerAlliance device does not match the colors you see on your display — for example a color cast that is too cool or too warm, video that is too dark or too bright, or inaccurate saturation.
Before you begin
Use the built-in snapshot feature of your ClonerAlliance device to capture a representative frame, and save it as a
.jpgimage. A snapshot taken from an actual recording reflects the real color output far better than a photo taken with a phone or an image from another source.Open the calibration page on the same display you normally use to watch and edit your recordings. Different monitors reproduce colors differently, so calibrating on your real monitor gives the most accurate result.
Pick a frame that clearly shows the color problem, such as skin tones, interface colors, or product colors that are easy to judge.
Step 1: Calibrate the color
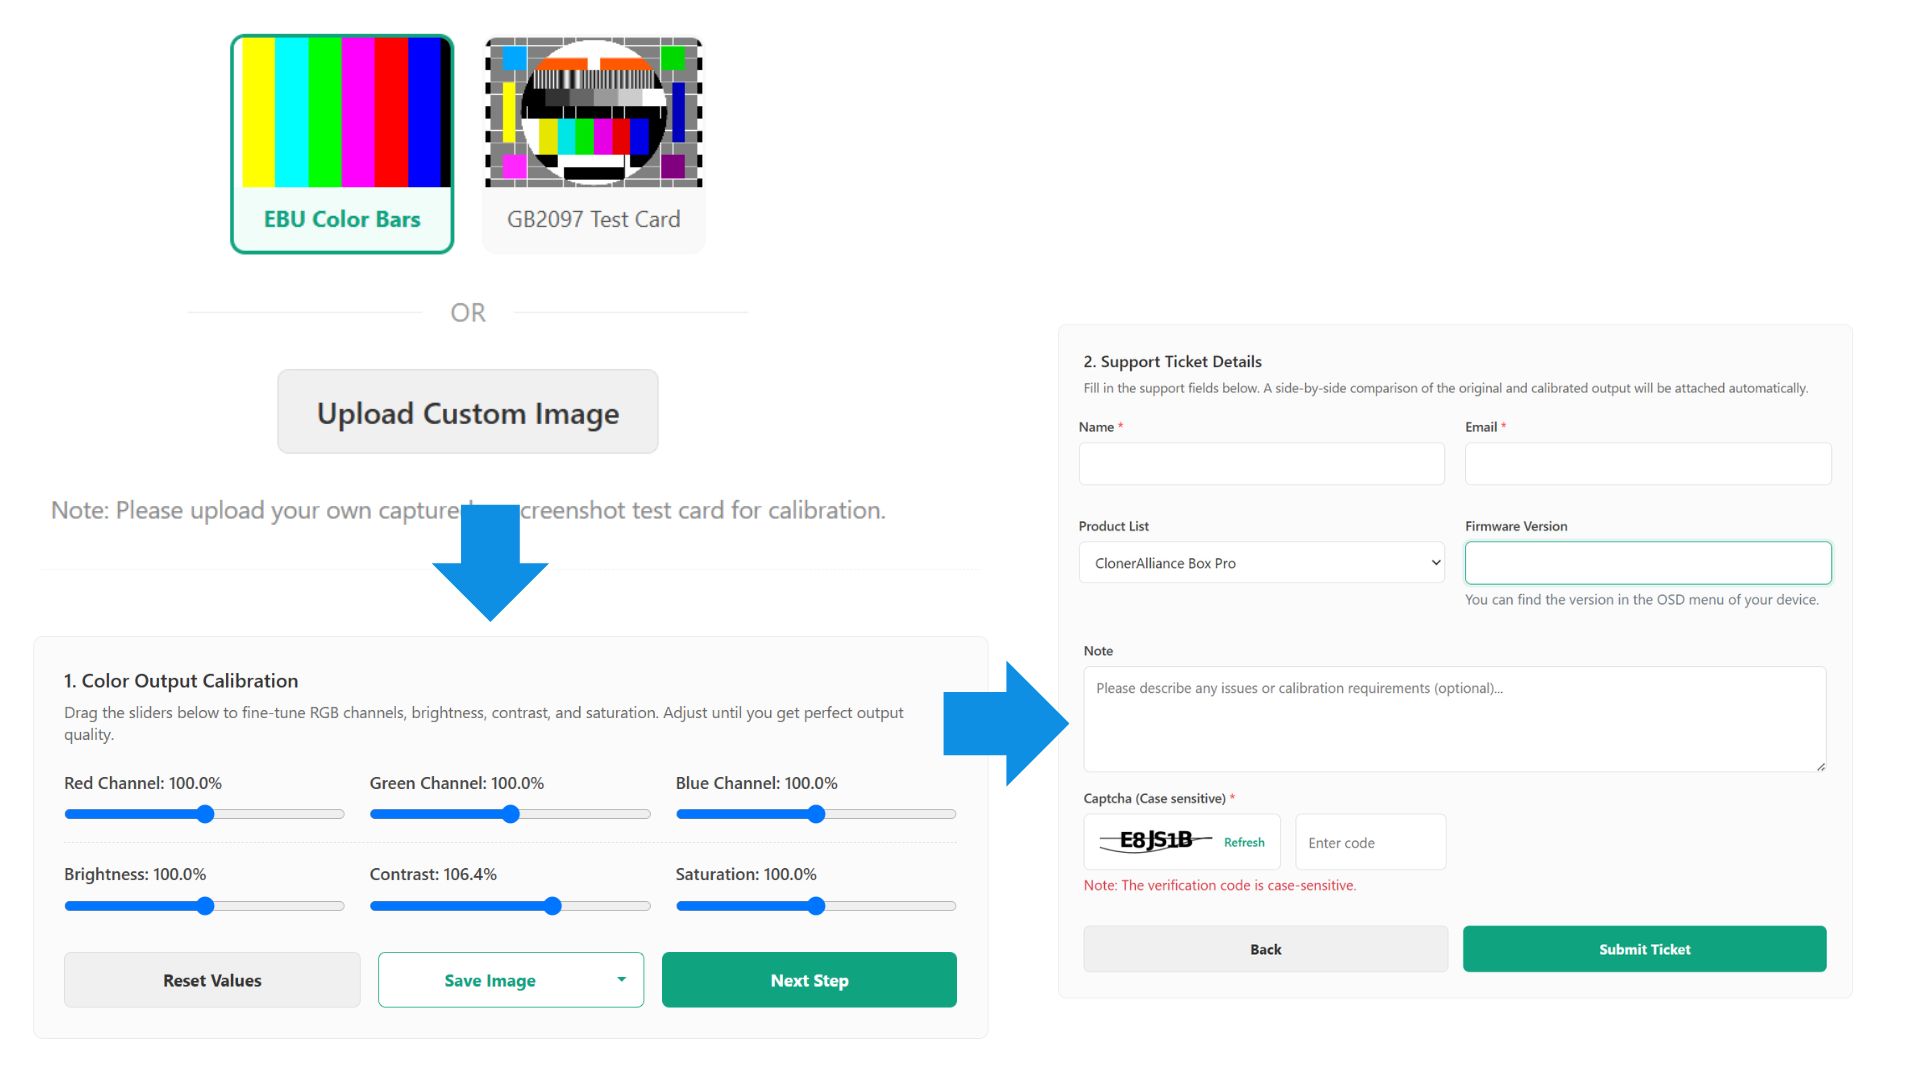
On your normal display, open https://www.cloner-alliance.com/custom-calibration/.
Under Step 1: Color Calibration, choose a test image. You can use the built-in EBU Color Bars or GB2097 Test Card, or upload your own snapshot with the custom upload option (“Please upload your own captured or screenshot test card for calibration”).
Drag the sliders to adjust the image until the colors look correct to you. The available controls are:
Red Channel, Green Channel, Blue Channel — adjust each color channel individually (default 100.0%).
Brightness, Contrast, Saturation — adjust the overall tone (default 100.0%).
To start over at any time, click Reset Values to return all sliders to 100.0%.
(Optional) Click Save Image to keep a copy for your own records. You can choose Save Calibrated Image or Save Comparison Image (a before/after comparison).
When the image looks right, click Next Step.
Step 2: Submit the calibration to us
Under Step 2: Support Ticket Details, fill in the form. A side-by-side comparison of the original and calibrated output is attached automatically, so you do not need to save or upload the image yourself.
Name — your name.
Email — please enter a valid email address. We will contact you and send the updated firmware to this address.
Product List — select your ClonerAlliance device from the dropdown.
Firmware Version — enter the current firmware version of your device. This lets us match your calibration to the exact firmware you are running. You can find the version in the OSD menu of your device.
Note — describe the color problem or any calibration requirements. This field is optional.
Complete the captcha verification. It is case-sensitive; use the refresh option if it is hard to read.
Click Submit Ticket to send us your calibration result. To go back and readjust the image, click Back.
Tips for a more accurate result
Calibrate on the monitor you actually use, not a temporary substitute.
Use a snapshot captured by the device itself, not a photo or an image from another source.
Choose a frame where the color issue is obvious, such as skin tones, interface colors, or product colors.
Calibrate under normal viewing conditions. Avoid special display modes such as vivid, eye-care, or night mode.
Keep in mind that if your monitor’s own colors are noticeably inaccurate, this will also affect the final result.
What happens after you submit
After we receive your calibration result, we will adjust the recording color parameters in the firmware based on your calibrated image. We will then contact you at the email address you provided and send you the updated firmware to test. If needed, we will keep refining until you are satisfied with the recording colors.
Related articles: