How to use HDML-Cloner Wand Helper Mobile for Android?
About
Download and install HDML-Cloner Wand Helper Mobile from https://www.cloner-alliance.com/download.html to your Android phone. Run HDML-Cloner Wand Helper Mobile. If HDML-Cloner Wand device is not connected, the following interface will be shown, which prompts you to connect HDML-Cloner Wand. This interface shows you how to connect HDML-Cloner Wand to your mobile phone and HDMI device.

 : Tap to open the “Settings” window.
 : Tap to open the help page.
 : Tap to open the folder where the recorded videos are saved.
How to connect HDML-Cloner Wand to your mobile phone and video player?
Plug the OTG cable into the USB port of Android phone.
2. Plug the USB cable on HDML-Cloner Wand into the other end of the OTG cable.
Plug the mini connector end to the HDMI port of HDML-Cloner Wand.
4. Connect an HDMI cable between the HDMI to mini-HDMI connector and video player.
Note: Please connect devices strictly in the order of 1-2-3-4, otherwise the problem “Not found HDML-Cloner Wand device” may occur.
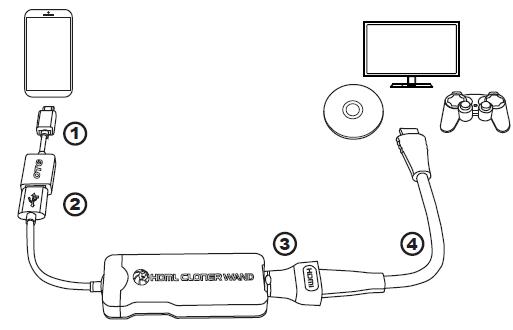
Note: You need to use mobile phones with Android 4.1 or above supporting OTG.
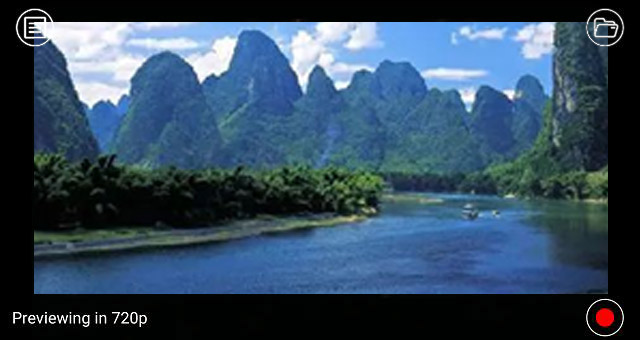
After HDML-Cloner Wand is properly connected, HDML-Cloner Wand Helper Mobile will automatically search for the video and then play the video. The preview window is shown below:
 : Tap on it and there will be two options: Settings and About.
 : Tap to open the folder where the recorded videos are saved.
 : Preview the video in 720p. You can also set it as 1080p in the
“Settings” window.
: Preview the video in 720p. You can also set it as 1080p in the
“Settings” window.
 : Tap to start recording videos.
Tap on the “Record” button to start recording. Tap on the screen to show/hide the buttons. During the recording process, the buttons will not work and you can only view the recording information.
.jpg)
 : Record the video in 720p. You can also set it as 1080p in the
“Settings” window.
: Record the video in 720p. You can also set it as 1080p in the
“Settings” window.
Note: If the source input resolution is smaller than the set resolution, the source resolution will be used automatically.
 : The green dot means it is recording. The time indicates how
long the video has been recorded.
: The green dot means it is recording. The time indicates how
long the video has been recorded.
 : Tap to stop recording.
Files
Tap to enter this interface.
On this interface, you can view the video length and video size. At the bottom of this interface, you can view the storage space and other information. If you want to play the video, simply tap on the video to start playing.
 : Shows the video name. HCWH is short for HDML-Cloner Wand
Helper. 01042016 represents the date format (2016-01-04) and 172335
represents the time format (17:23:35).
: Shows the video name. HCWH is short for HDML-Cloner Wand
Helper. 01042016 represents the date format (2016-01-04) and 172335
represents the time format (17:23:35).
 : Shows the video length.
 : Shows the video size.
.jpg) : Video capacity bar. When the recorded files occupied less
than 30% of the storage space, this section will be shown in yellow. If
it exceeds 30%, the section will be shown in purple. The free space will
be shown in grey. 70% represents total occupied space.
: Video capacity bar. When the recorded files occupied less
than 30% of the storage space, this section will be shown in yellow. If
it exceeds 30%, the section will be shown in purple. The free space will
be shown in grey. 70% represents total occupied space.
 : 2 represents the number of recorded files, 145.64MB
represents the total size of recorded files, 2.79GB represents the free
space of the mobile phone and 9.37GB represents the total size of the
mobile phone.
: 2 represents the number of recorded files, 145.64MB
represents the total size of recorded files, 2.79GB represents the free
space of the mobile phone and 9.37GB represents the total size of the
mobile phone.
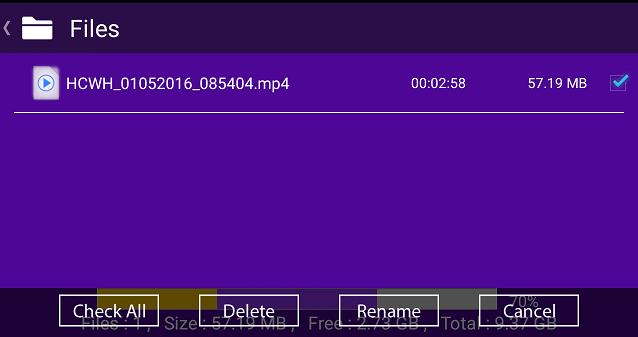
If you press and hold one video for a while, some buttons for editing the video will appear. You can check the box on the right side to edit one or more videos.
Check All: Tap to select all recorded files.
Delete: Tap to delete the selected files.
Rename: Tap to rename the selected files.
Cancel: Tap to exit the video editing.
Settings Interface
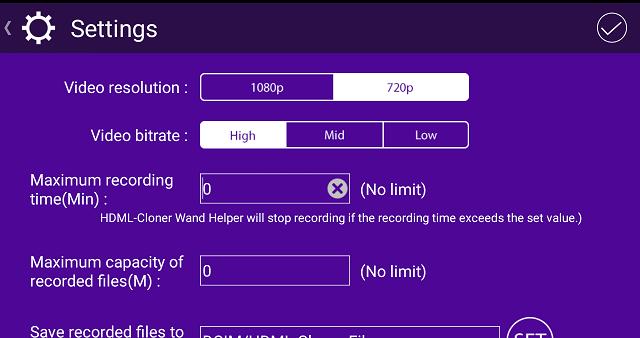
Video resolution: Set the resolution for previewing and recording videos. 1080p and 720p are available.
Video bitrate: High, Mid and Low are available.
Maximum recording time (Min): Set the maximum recording time. It will stop recording and save the video automatically if the recording time exceeds the set value. 0 means to record all the time and never stop.
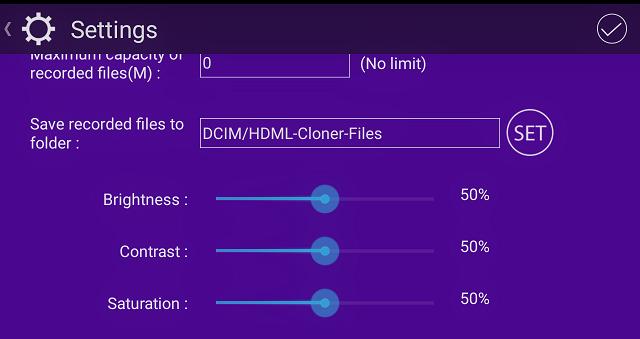
Maximum capacity of recorded files (M): Set the maximum capacity of recorded files. It will stop recording and save the video automatically if it exceeds the set value. 0 means to record without capacity limit.
Save recorded files to folder: Set the saving path of recorded videos.
Brightness: Drag the roll to left or right to make pictures brighter or darker.
Contrast: Drag the roll to left or right to adjust the degree of difference between the darker and lighter parts of a picture.
Saturation: Drag the roll to left or right to adjust the color purity. The higher the purity is, the more distinctive the performance is. The lower the purity is, the darker the performance is.
About
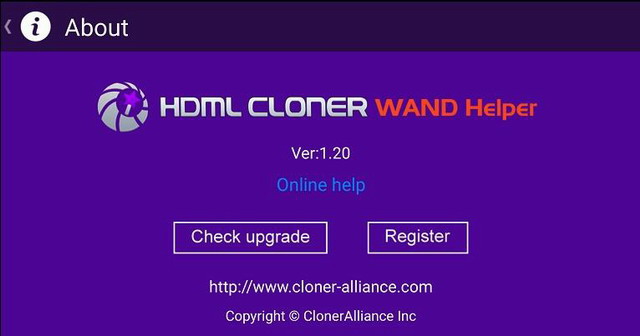
On this interface, you can view the software logo, version, copyright, etc.
Check upgrade: Check whether there is a new version.
Register: Open the “Register” window.

Fill in your proper Email address, real name and code. You can
tap  to scan the QR code in the label on the back of
HDML-Cloner Wand directly using the QR code scanning tool and the code
will be identified automatically. Then tap on “Register” to finish the
registration.
to scan the QR code in the label on the back of
HDML-Cloner Wand directly using the QR code scanning tool and the code
will be identified automatically. Then tap on “Register” to finish the
registration.