How do I use ClonerAlliance AI Video Enhancer?
After successful installation of ClonerAlliance AI Video Enhancer, it’s time to start enhancing your videos and images. The software features an easy-to-use GUI that makes the process straightforward. Below, we provide a step-by-step guide on how to use ClonerAlliance AI Video Enhancer.
Step 1: Launch the Application
You can start ClonerAlliance AI Video Enhancer by clicking the application’s icon on your desktop or from your computer’s start menu.
Step 2: Open Your Image or Video
On the main interface, drag and drop one video or image file you wish to enhance into the file frame. ClonerAlliance AI Video Enhancer supports various file formats including png, jpeg, bmp, webp, tif for images, and mp4, wemb, gif, mkv, flv, avi, mov, qt for videos.
Step 3: Choose Enhancement Settings
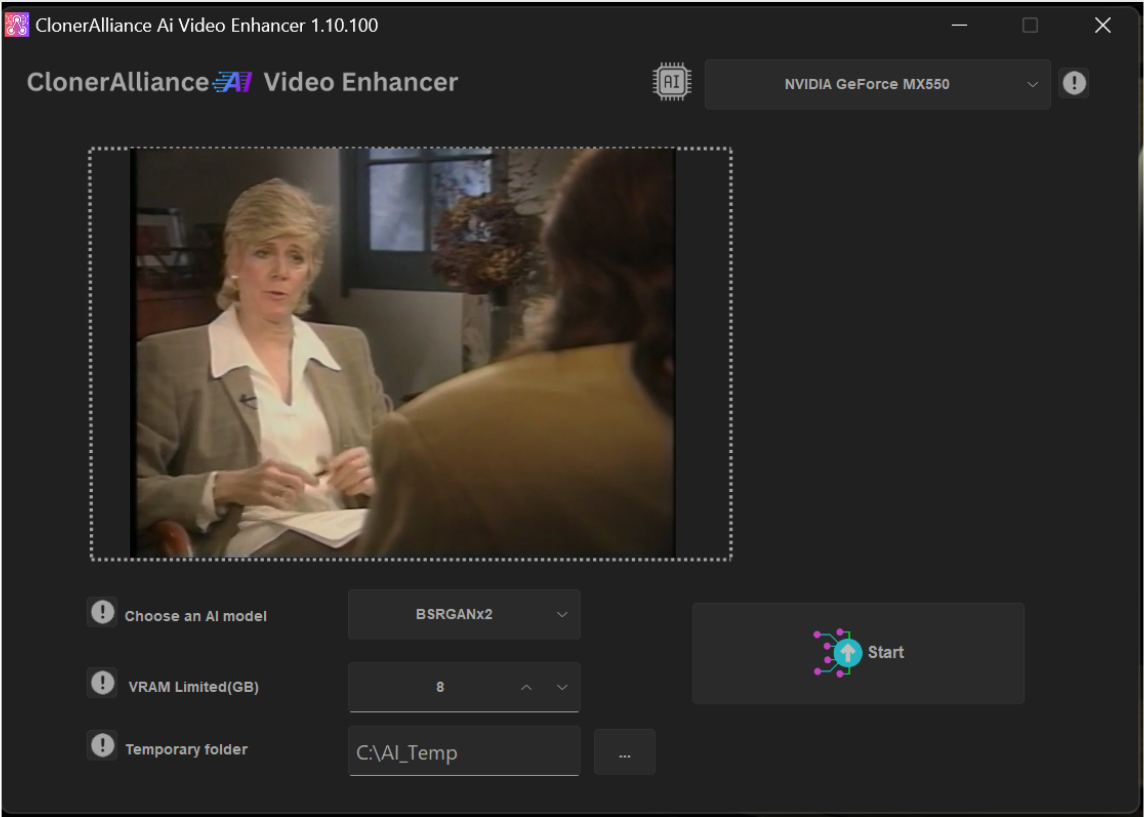
Once you’ve selected a file, choose the enhancement settings according to your requirements.
Choose a GPU for the enhancement process. If you have multiple GPUs, you can choose the one you want to use for the enhancement process.
Choose an AI model. ClonerAlliance AI Video Enhancer offers three AI models: BSRGANx2, BSRGANx4, RealSR_JPEGx4. The BSRGANx2 model is suitable for 2x upscaling, the BSRGANx4 model is suitable for 4x upscaling, and the RealSR_JPEGx4 model is suitable for animation video upscaling. You can choose the model according to your needs.
Choose VRAM Limited. If you have a GPU with less than 8GB VRAM, you can enable this option to reduce the VRAM usage.
Set the temporary folder. You can set a temporary folder for the enhancement process. The default temporary folder is C:AI_Temp. If you have a large file to enhance, you can set a temporary folder on a disk with more free space.
Step 4: Start the Enhancement Process
When you’ve set your preferences, click on the ‘Start’ button to begin the enhancement process. The time it takes will depend on the size of the file and the complexity of the enhancements.
Step 5: Save and Export Your Enhanced File
After the enhancement process is complete, you can preview the result. If you’re satisfied with the outcome, click the ‘Save’ button to store the enhanced image or video. Choose a destination on your computer where you want to save the file and click ‘OK’.
Note: If you encounter any issues while using ClonerAlliance AI Video Enhancer, please contact ClonerAlliance support for assistance.
Enjoy using ClonerAlliance AI Video Enhancer to enhance, enlarge, and reduce noise in your images and videos!